Upgrading your kitchen is a big journey for any homeowner. It starts with a dream and ends with a beautiful new surface. Many people in Milwaukee feel nervous about the process. They worry about the mess or the timeline. Understanding the steps can help you feel at ease. It makes the transition from old to new much smoother.
The installation day is the climax of your project. It is when all your planning finally turns into reality. Before the stone arrives, there is plenty of prep work. You need to clear your old counters and disconnect the plumbing. This ensures the crew has a clean space to work. A little preparation goes a long way in saving time.
When you are ready to start, finding the right team is key. You want experts who know the local architecture and styles. For those looking for professional countertop installation Milwaukee, choosing a local specialist is a smart move. They understand the specific needs of homes in our area. From historic bungalows to modern condos, they have seen it all.
The Initial Consultation and Selection
Everything starts with a conversation about your vision. You will meet with a designer to discuss materials and colors. This is where you decide between stone, quartz, or wood. You should think about how you use your kitchen every day. Do you cook often or mostly use it for entertaining?
During this phase, you will look at many different slabs. It is helpful to bring cabinet and flooring samples with you. This ensures the colors match perfectly under the showroom lights. You will also discuss edge profiles and sink types. These small details define the final look of your kitchen.
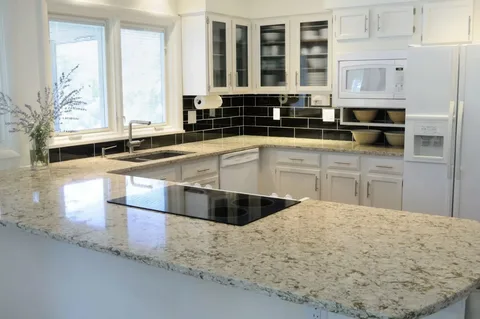
Many homeowners today are moving toward a sleek, updated aesthetic. They often choose modern granite countertops to create a high-end feel in their Milwaukee homes. These slabs offer unique patterns that you won’t find anywhere else. They bring a touch of nature indoors while keeping things looking fresh. Once you pick your slab, the technical work begins.
Creating the Perfect Template
The template is the most important part of the technical process. A professional will come to your Milwaukee home to take measurements. They don’t just use a tape measure anymore. Most use high-tech lasers to get a digital map of your cabinets. This accounts for walls that might not be perfectly straight.
You should be present during this appointment. The technician will ask where you want your faucet holes drilled. They will also discuss where the seams will go. Seams are the joints where two pieces of stone meet. You want them placed in areas that are less noticeable.
Once the digital map is ready, it goes to the fabrication shop. The shop uses this map to cut the stone with extreme precision. This ensures that when the stone arrives, it fits like a glove. Any error here can cause big delays later on.
Preparation and Demolition Day
Before the new stone arrives, the old counters must go. Some companies offer demolition services as part of the package. If you do it yourself, be careful not to damage the cabinets. Check that the base cabinets are level and strong. Stone is very heavy and needs a solid foundation.
You will also need to have your sink and cooktop ready. The installers need to verify the fit during the process. It is a good idea to clear a path from the front door to the kitchen. These slabs are heavy and difficult to navigate through tight corners.
To ensure the best results, you should hire local countertop experts to manage the heavy lifting. This protects your home and your new investment from accidental damage. Professional installers have the specialized carts and tools needed for the job.
The Actual Installation Process
On the big day, the crew will arrive with your finished slabs. They will carefully carry the stone into your kitchen. They usually start with the largest piece first. They dry-fit the stone to check for any minor adjustments. If everything looks good, they begin the permanent set.
They apply a strong adhesive to the top of the cabinets. The stone is then lowered into place. If your kitchen has seams, they will join the pieces now. They use a special epoxy that is color-matched to your stone. A “seam setter” tool pulls the pieces together tightly.
Once the seams are set, they will level the entire surface. They use small shims under the stone to make it perfectly flat. This is vital for tasks like rolling out dough or preventing spills from running off. The final step is to clean the surface and remove any excess glue.
Finishing Touches and Sealing
After the stone is in place, the sink is usually installed. If you chose an undermount sink, it is glued to the bottom of the stone. It may need a few hours to dry before the plumber can reconnect the pipes. You should wait at least 24 hours before using the sink for heavy tasks.
Most natural stones need a sealer to prevent stains. The installers will often apply a high-quality sealer before they leave. This creates a barrier against water, oils, and food pigments. You can click here to learn more about how to maintain this seal over time.
The crew will then do a final walkthrough with you. They will show you how to clean the surface properly. They will also point out the seams and the sink installation. This is your time to ask any final questions about care and maintenance.
Tips for Homeowners
- Clear the Area: Move all small appliances and decorations off the counters.
- Safety First: Keep pets and children away from the work zone.
- Check Leveling: Ensure your cabinets are level before the installers arrive.
- Be Available: Stay home during the installation to answer questions.
- Verify the Slab: Check the stone for cracks or chips before it is installed.
Frequently Asked Questions
How long does the installation take?
The actual installation usually takes 3 to 6 hours. However, the entire process from template to install can take 1 to 2 weeks.
Do I need to be home for the installation?
Yes, it is best to be there. You need to sign off on the work and answer any layout questions.
Can I use my kitchen immediately?
You should wait at least 24 hours for the adhesives and sealers to dry. It is best to keep the area clear until the following day.
Will there be a lot of dust?
Most of the cutting is done at the shop. However, there may be some light drilling for faucet holes on-site. The crew will usually clean up after themselves.
How do I maintain my new countertops?
Use a pH-neutral cleaner and a soft cloth. Avoid harsh chemicals like bleach or vinegar. Reseal your stone once a year to keep it looking new.


Discover Modern Comfort: A Guide to Apartment Rent in Beirut
Beirut, the lively capital of Lebanon, is a city that blends deep-rooted history with a mo…


Discover Modern Comfort: A Guide to Apartment Rent in Beirut
Beirut, the lively capital of Lebanon, is a city that blends deep-rooted history with …